4.11.15

The Competitive Landscape of Blogging & More

This blog was started over 9 years ago while I was trapped in my parent's small apartment in Hong Kong. They had moved there when I left for college and I was there for the summer, enduring the crowded transportation, smokey air & conversations which I could not understand, while my friends were enjoying their beautiful Southern California summers at the beach.

With our almost doll-house sized kitchen, I learned to re-fall in love with a dormant passion of mine - baking. I scoured the internet for food blogs and taught myself everything from my first marshmallow fondant to how to use what was available in the British/Chinese supermarkets for American recipes. I took a couple Wilton cake decorating classes while I was out there and quickly got hooked on the aesthetics of food. From there, I came back to school in San Diego and continued to fill my roommate's bellies and kitchen counters with cookies, bars, cakes & more. I loved food. I loved food with the passion that fills a naive college student who spends her money on flour, butter & sugar, instead of vodka and slinky dresses (although slightly dangerous trips to Tijuana to go clubbing and slinky dresses were not entirely avoided).

I blogged about what I made because I was in love with what I was doing. I loved the process, the sugar, and the delicious outcome. I joined the Daring Bakers (I'm not even sure if they are still active?) and proudly posted my rendition of each of the monthly challenges. Garnering a following, advertisers, and social media promotion were the last thing on my mind. I baked and baked until I graduated college. I came full circle, back to my parents house in Orange County, CA, and continued baking as I looked for a "real" job in the "real" world.

I slowly began to realize that the "real" world and the advent of social media, advertisers and increasing number of bloggers was creating a competitive blogging landscape. With the low barrier of entry and rising culture of the foodie, being a food blogger was almost trendy. And it was clear that the intention of many was to make money off of doing it. So like the hipster I was (am?!), I abruptly stopped blogging.

Fast forward to today, where I am sitting in my apartment with a full time job I used to love, a dying career in entertainment, a failed start-up, and a shiny new event planning company.  When I was younger, I thought the "right" path was to go to college, get a full time job like you see in the movies (no one tells you about all the entry level stuff you have to deal with), marry a good man and have a house and kids. While many of my friends have followed this path and are perfectly happy, I have come to realize that life is like walking through a paintball field in a white t-shirt and no protection. Although, I'm not a plain white t-shirt kind of girl anyway.

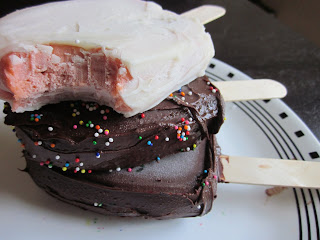
A photo of what isn't going to be happening, anytime soon.


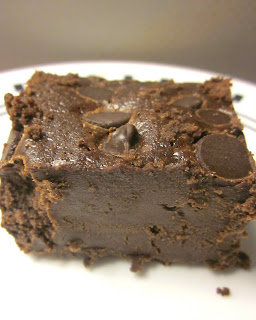
Peanut butter filled dark chocolate cake with my favorite, not-too-sweet flour frosting

Perfect Cupcake Frosting and Filling
3 T Flour
1/2 C milk (whole milk is best, but I use non-fat when it’s all I have and it’s actually fine)
1/2 C real butter (I prefer salted, but you can use also unsalted and add salt to taste)
1/2 C sugar (that’s granulated sugar, not powdered sugar)
1 t vanilla extract, or other flavor if you wish.
Whisk together the flour and the milk. Heat in a small sauce pan on medium heat.
Whisk continuously until it starts to thicken. Let it cook, while stirring with a rubber spatula, until you can start to see the bottom of the pan.   Continue to cook until mixture has the consistency of thick pudding or paste.
Put  mixture in the fridge and let it cool completely, it’s fine if it stays in there long enough to get chilly, you just don’t want it warm at all. As it’s cooling, feel free to stir it occasionally to speed up the process and keep it from forming a crust on top.
It an electric stand mixer, beat the butter and the sugar for a minute or two until well combined and fluffy. You’ll want to use the whisk attachment on a stand mixer if you have one, instead of the flat paddle. Then while beating, add in the thickened milk mixture and the vanilla. Beat to combine and then scrape down the sides. Mixture will separate and look messy, keep beating!  Continue beating until mixture comes together and is light and fluffy, about 7-8 minutes, but time varies.  Take a sample of frosting between your fingers; frosting is done when light and fluffy and sugar granules are dissolved.

Via Our Best Bites  


11.7.11

Cake Pop[sicles]


Cake pops/cake balls/cake truffles/whatever you want to call cake crumbs and frosting mashed together are an ingenius fad! Because bakeries can charge money for cute balls of cake scraps and leftover frosting- really, smarter than the cupcake thing, the frozen yogurt thing, the food truck thing, and the next food fad thing.

After trimming and frosting the mermaid/underwater cake in the previous post below, I had loads of leftover pink cake, chocolate cake, cream filling and buttercream. The solution? Cake popsicles! Because that frozen mush of cake crumbs and frosting really does taste amazing frozen and is funner to eat on a popsicle stick ;)

These were made the exact same way as cake pops/cake truffles- by turning the cake scraps into crumbs (I used a food processor) and adding frosting a bit at a time until it became solid enough to mold. I shaped the cake into popsicle shapes, stuck a large popsicle stick through them and let them chill out in the freezer on a wax paper lined cookie sheet. After a couple hours they were solid enough to dip into chocolate, sprinkles, nuts, and anything else that you can think of.

Store these in the freezer and try them cold- after all, they are popsicles :)

10.7.11

Mermaid Cake!


This is a mermaid cake made for my good friend's daughter, Mahea. It was her 4th birthday on Saturday and we celebrated at Seascape Kids in Anaheim. This is us having fun in the play structure and on the slide :) Yes, I got pelted in the face by the foam ball gun several times.


The top tier of her cake was a white (pink) cake with vanilla cream and the bottom tier was a chocolate cake with vanilla cream filling. The blue is buttercream and all the accents are marshmallow fondant. She wished for a mermaid cake this year so that was the idea :) Happy Birthday Mahea!!

27.3.11

March 2011 Daring Baker's Challenge


The March 2011 Daring Baker’s Challenge was hosted by Ria of Ria’s Collection and Jamie of Life’s a Feast. Ria and Jamie challenged The Daring Bakers to bake a yeasted Meringue Coffee Cake.

I chose to do a Blueberry-Lemon Coffee Cake- Instead of the chocolate, cinnamon and walnuts, I studded the meringue with fresh blueberries, dollops of lemon curd and lemon zest. I also threw a couple teaspoons of zest into the dry ingredients for the dough.

Love the cake- not too sweet, soft, moist and very beautiful.


FILLED MERINGUE COFFEE CAKE
Makes 2 round coffee cakes, each approximately 10 inches in diameter
The recipe can easily be halved to make one round coffee cake

Ingredients
For the yeast coffee cake dough:

4 cups (600 g / 1.5 lbs.) flour
¼ cup (55 g / 2 oz.) sugar
¾ teaspoon (5 g / ¼ oz.) salt
1 package (2 ¼ teaspoons / 7 g / less than an ounce) active dried yeast
¾ cup (180 ml / 6 fl. oz.) whole milk
¼ cup (60 ml / 2 fl. oz. water (doesn’t matter what temperature)
½ cup (135 g / 4.75 oz.) unsalted butter at room temperature
2 large eggs at room temperature

10 strands saffron for Ria’s version (Saffron might be hard to find and it’s expensive, so you can substitute with ½ - 1 teaspoon of ground cardamom or ground nutmeg. Or simply leave it plain like Jamie’s version)

For the meringue:

3 large egg whites

at room temperature
¼ teaspoon salt
½ teaspoon vanilla
½ cup (110 g / 4 oz.) sugar

For the filling:

Jamie’s version:
1 cup (110 g / 4 oz.) chopped pecans or walnuts
2 Tablespoons (30 g / 1 oz.) granulated sugar
¼ teaspoon ground cinnamon
1 cup (170 g / 6 oz.) semisweet chocolate chips or coarsely chopped chocolate

Ria’s version:
1 cup (130 g / 5 oz.) chopped cashew nuts
2 Tablespoons (30 g / 1 oz.) granulated sugar
½ teaspoon garam masala (You can make it at home – recipe below - or buy from any Asian/Indian grocery store)
1 cup (170g / 6 oz.) semisweet chocolate chips ( I used Ghirardelli)

Egg wash: 1 beaten egg
Cocoa powder (optional) and confectioner’s sugar (powdered/icing sugar) for dusting cakes

**Garam (means “hot”) masala (means “mixture”) is a blend of ground spices and is used in most Indian savory dishes. It is used in limited quantities while cooking vegetables, meats & eggs. There is no “one” recipe for it as every household has a

recipe of their own. Below, I am going to share the recipe which I follow.

4 or 5 sticks (25 g) Cinnamon Sticks (break a stick and open the scroll)
3 ½ tablespoons (25 g / less than an ounce) Cloves, whole
100 g. (3.5 oz.) Fennel seeds
4 tablespoons (25 g / less than an ounce) Cumin seeds
1 ½ tablespoons (10 g / less than half an ounce) Peppercorns
25 g (less than half an ounce) G

reen Cardamom pods

In a small pan on medium heat, roast each spice individually (it hardly takes a minute) until you get a nice aroma. Make sure you stir it throughout so that it doesn’t burn. As soon as each spice is roasted, transfer it to a bowl to cool slightly. Once they are all roasted, grind into a fine powder by using a coffee grinder, or pestle & mortar. Store in an airtight container and use as needed.

Directions:

Prepare the dough:

In a large mixing bowl, combine 1 ½ cups (230 g) of the flour, the sugar, salt and yeast.

In a saucepan, combine the milk, water and butter and heat over medium heat until warm and the butter is just melted. Ria’s version: add the 10 saffron threads to the warmed liquid and allow to steep off of the heat for 10 minutes. This will give the mixture a distinct aroma and flavor and a yellowish-orange hue.

With an electric mixer on low speed, gradually add the warm liquid to the flour/yeast mixture, beating until well blended. Increase mixer speed to medium and beat 2 minutes. Add the eggs and 1 cup (150 g) flour and beat for 2 more minutes.

Using a wooden spoon, stir in enough of the remaining flour to make a dough that holds together. Turn out onto a floured surface (use any of the 1 ½ cups of flou

r remaining) and knead the dough for 8 to 10 minutes until the dough is soft, smooth, sexy and elastic, keeping the work surface floured and adding extra flour as needed.

Place the dough in a lightly greased (I use vegetable oil) bowl, turning to coat all sides. Cover the bowl with plastic wrap and a kitchen towel and let rise until double in bulk, 45 – 60 minutes. The rising time will depend on the type of yeast you use.

Prepare your filling:In a small bowl, combine the cinnamon and sugar for the filling if using. You can add the chopped nuts to this if you like, but I find it easier to sprinkle on both the nuts and the chocolate separately.

Once the dough has doubled, make the meringue:
In a clean

mixing bowl – ideally a plastic or metal bowl so the egg whites adhere to the side (they slip on glass) and you don’t end up with liquid remaining in the bottom – beat the egg whites with the salt, first on low speed for 30 seconds, then increase to high and continue beating until foamy and opaque. Add the vanilla then start adding the ½ cup sugar, a tablespoon at a time as you beat, until very stiff, glossy peaks form.

Assemble the Coffee Cakes:

Line 2 baking/cookie sheets with parchment paper.

Punch down the dough and divide in half. On a lightly floured surface, working one piece of the dough at a time (keep the other half of the dough wrapped in plastic), roll out the dough into a 20 x 10-inch (about 51 x 25 ½ cm) rectangle. Spread half of the meringue evenly over the rectangle up to about 1/2-inch (3/4 cm) from the edges. Sprinkle half of your filling of choice evenly over the meringue (ex: half of the cinnamon-sugar followed by half the chopped nuts and half of the chocolate chips/chopped chocolate).

Now, roll up the

dough jellyroll style, from the long side. Pinch the seam closed to seal. Very carefully transfer the filled log to one of the lined cookie sheets, seam side down. Bring the ends of the log around and seal the ends together, forming a ring, tucking one end into the other and pinching to seal.

Using kitchen scisso

rs or a sharp knife (although scissors are easier), make cuts along the outside edge at 1-inch (2 ½ cm) intervals. Make them as shallow or as deep as desired but don’t be afraid to cut deep into the ring.

Repeat with the remaining dough, meringue and fillings.

Cover the 2 coffee cakes with plastic wrap and allow them to rise again for 45 to 60 minutes.

Preheat the oven to 350°F (180°C).

Brush the tops of the coffee cakes with the egg wash. Bake in the preheated oven for 25 to 30 minutes until risen and golden brown. The dough should sound hollow when tapped.


2.2.11

Mrs.Field's SUPERFUDGEBROWNIES and prostitution

I've been thinking...would you call modeling "facial prostitution"? I mean, it's using your face to make money right? "Hi, I'm a facial prostitute". But by that logic, you would call other professions "brain prostitution" because you use your brain to make money! Hm. Lame/doesn't make sense? Ok thought so. Plus extremely unrelated to brownies. Which trump prostitution any day!

I am on Team Fudgey as far as brownies go...I like things rich (like my men ((hehe sorry boyfriend! lets see how long it takes for you to notice this)) ), decadent and very sweet. I've found that brownies/cookies that use melted chocolate and butter instead of cocoa powder produce a chewier, richer and fudgier texture.

I've been scouring different brownie recipes recently looking for lots of melted chocolate, butter, sugar and eggs with very little flour. I was flipping through the Mrs.Field's Cookie Book (which does not include the recipe for her famous chocolate chip cookies sorry!) and came across her recipe for Super Fudge Brownies. I'll be honest, the cookie book looks like it's from the 80s or something with funky pictures and a kind of un-interesting layout. Normally I don't like trying recipes that are in recipes books with weird aesthetics (recipe-book-discrimination, sorry) but I loved that her brownie recipe did not include any leavening agents and fit what I was looking for. So I tried it ...and loved it.

You know a brownie recipe is fudgey when it looks like fudge- the candy. Anyone on Team Fudgey would absolutely adore these brownies. They are dense, rich, and almost melt in your mouth. They remind me of a flourless chocolate cake with a truffle-like texture and deep, dark chocolate taste.

It's too bad that I have to wear coconuts on Friday or else I'd eat the whole pan.

Super Fudge Brownies
Mrs.Fields Cookie Book

6 oz. unsweetened baking chocolate
1 cup salted butter, softened
4 large eggs
2 cups white sugar
1 Tbsp. pure vanilla extract
1/2 cup all-purpose flour
pinch salt
1 cup (6 oz) semisweet chocolate chips

Yield: 16 brownies (2 inch squares)

1. Pre-heat oven to 300F. Grease an 8x8 inch baking pan.
2. Combine unsweetened baking chocolate and butter in a medium saucepan. Melt over medium-low heat, stirring constantly until pieces are almost melted. Remove from heat and stir until smooth.
3. In a large bowl, using an electric mixer on medium speed, beat eggs until light yellow in color- about 5 minutes. Add sugar and blend on low until thoroughly combined.
4. Add vanilla and melted chocolate to the egg and sugar mixture. Blend on low speed until smooth, scraping down the sides of the bowl. Add flour and pinch salt. Mix thoroughly.
5. Pour batter into greased pan. Smooth surface with a spatula and spirnkle uniformly with chocolate chips. Bake on the center rack of oven for 45-55 minutes. The batter should be set and a toothpick inserted in the center should come out clean or with a few moist crumbs. Do not overbake.
6. Cool to room temperature. Cover and refrigerate for at least 1 hour. To cut brownies, dip a sharp knife in hot water and wipe dry. Use warm knife to slice brownies. Serve chilled.


18.12.10

Marshmallows!!!

The minute I got my stand mixer, I knew one of the first things I wanted to make was homemade marshmallows. I'm one of those marshmallow people who just loves marshmallows and could eat them for days. But homemade marshmallows require a good beating- like 12 minutes of beating straight. And I was not about to do that with a hand mixer!!

Homemade marshmallows are 100 million zillion thousand times fluffier, lighter, and more addicting than regular marshmallows from the bag. In fact, once you go homemade marshmallow, store bought ones will feel like rubbery slabs of sugar. Homemade marshmallows also leave room for flavoring, decorating, or turning into other candies (caramel covered marshmallows hello delicious!)

I made this batch of marshmallows for my marshmallow-addicted cousins (runs in the family). I
decided to portion out the batter and make four types- vanilla, strawberry, mocha and chocolate swirl. I used fresh strawberry puree for the strawberry flavor, a concentrated chocolate and coffee paste (hot water + cocoa + instant espresso) for the mocha and melted chocolate chips for the chocolate swirl. The strawberry ones took on a weird texture but the rest of them were delicious! Of course the sprinkle covered marshmallow was the first to go, but the runner up was the mocha. The chocolate swirled into the marshmallow tasted like a candy bar because of the contrasting textures of the chocolate and soft candy- yum! The ingredients are simple and the only difficult thing about these candies is waiting for them to set overnight. Mix and match with different flavors, colors, shapes and sizes- you really can't go wrong with these! Unless you are a marshmallow hater. In which case, go away.

Marshmallows

3 packets of knox gelatin
1/2 cup cold water
2 cups sugar
2/3 cup corn syrup
1/4 cup water
1/4 tsp. salt
1 tablespoon vanilla.

1. Line a 9x12 inch pan with saran wrap and light oil it. set aside.
2. In the bowl of electric mixer, sprinkle gelatin over 1/2 cup cold water. Let soften for 10 minutes.
3. Meanwhile, combine sugar, corn syrup and 1/4 cup water in small saucepan. Bring mixture to a hard, rolling boil and boil for 1 minute.
4. pour the boiling syrup into soaked gelatin and turn on the mixer using whisk attachment at high speed.
5. add the salt and beat for 12 minutes. After 12 minutes, add vanilla extract and beat to incorporate (or add another flavoring/add ins of your choice i.e. peppermint extract, mocha slurry, chocolate swirls, etc.)
6. scrape the marshmallow into the prepared pan and spread evenly (grease hands or spatula to help). Place another piece of lightly oiled plastic wrap on top of marshmallow to seal it. Let mixture sit overnight until cool and set.
7. Cut marshmallows with a sharp oiled knife or kitchen scissors. Dredge pieces in a mixture of equal parts cornstarch and powdered sugar.


Chewy, Buttery & Tasty Low Fat Chocolate Chip Cookies

You know the search for the perfect chocolate chip cookie? I think my journey has ended and my perfect cookie is LOW FAT!!! *dies* This recipe comes from America's Test Kitchen Family Baking Book. Since all the recipes in the book are tested over and over again a couple dozen times to make sure they work, I knew I could trust this suspicious "low fat" cookie recipe.

These cookies are ridiculous. I gave one to my brother and he asked for a second one. He's a pro at detecting "weird" ingredients and the first one to turn his nose up at "low fat" foods but he had no idea! They come out of the oven with crispy edges and are chewy throughout- they also STAY chewy for days. They are the PERFECT CHEWY CHOCOLATE CHIP COOKIE. EXCITED!!! What's the secret ingredient?! How is this done?!

Dates! I've been on a date kick lately because I recently discovered how much I love lara bars- they are these food bars made with all fruit and nuts- no sugar, no additives and no preservatives. And they come in flavors like apple pie, carrot cake and peanut butter cookie. And they TASTE EXACTLY LIKE THOSE THINGS. no joke. *dies again* Anyway the point is, they are held together by dates and so in an attempt to recreate these bars at home, I had a giant tub of dates in my fridge. Which just so happen to be the secret to these cookies.

These cookies are low fat because they cut out a majority of the butter in exchange for date puree- weird but it works. To mask the flavor of the dates and pump up that amazing butter flavor, the butter is browned in a pan over the stove before going into the batter. Browning butter brings out all kinds of luscious buttery flavors and it works like a gem in this recipe. I also thought that as long I was trying to make "healthy" cookies, I would add some whole grain. So I swapped a cup of the all purpose flour with white whole wheat flour. I'm so bad. Yet these cookies are so good.

Don't be afraid of the dough seems kind of weird a dry- it comes together when you roll it into a ball and while it bakes somehow. I also don't think it is necessary to bother with their method of shaping the cookies- I think using a cookie scoop would be quicker and they would look fine.

Big and Chewy Light Chocolate Chip Cookies

1/4 cup dried dates (chopped) or whole dates
3 tablespoons unsalted butter
1 cup all purpose flour
1 cup white whole wheat flour (or all purpose flour but you know you want your fiber)
1/2 tsp. baking soda
1/2 tsp. salt
1 1/4 cups packed light brown sugar
1 egg
2 tsp. vanilla extract
1/2 cup chocolate chips

1. Preheat oven to 325 degrees. Line baking sheet with silpat or parchment paper.
2. If your dates are dried, bring 1 cup of water to boil and add dried dates. Boil till dates are tender and puree in the food processor until you have a thick paste. If your dates aren't dried, skip the boiling and go straight to pureeing them. You should have a little over 1/4 cup of date puree.
3. Cook butter in a small saucepan over medium heat until nutty smelling and brown, about 4 minutes. let cool.
4. Whisk flour, baking soda and salt together in a separate bowl. In a large bowl, beat the melted butter, brown sugar and date puree together until smooth about 1-2 minutes. Beat in the egg and vanilla until combined about 30 seconds, scraping the sides.
5. reduce mixer to low and add flour mixture until combined. reserve 2 tablespoons chocolate chips then mix in remaining chips until incorporated.
6. Working with 2 tablespoons of dough at a time, roll dough into balls, tear the balls in half and press back together with the torn side up. (or skip this step and roll dough into regular balls and place on cookie sheet) Lay the cookies jagged side up on the prepared baking sheets, spaced about 2 inches apart. press the remaining chocolate chips evenly into cookies.
7. bake cookies, one sheet at a time, until the edges are set adn beggining to brown but the centers are still soft and puffy, 15- 20 minutes, rotating the sheet halfway through baking. (My cookies only took around 13-14 minutes)
8. let the cookies cook on the baking sheet for 10 minutes, then serve warm or transfer to a wire rack and let cool completely.